
Synth bike :-)

[vimeo=http://vimeo.com/4971771?pg=embed&sec=]
onboard, tactile controls:
- power (on/off) – with LED feedback
- lights (on/off) – toggle for integrated front-facing bike lights
- tune (potentiometer) – adjusts wheel circumference variable to control tonal range
- volume (potentiometer) – audio amplifier gain control
inputs:
- hall effect sensor in (1/8” stereo plug)
- programming connection (usb) – may/may not be externally accessible
outputs:
- integrated speaker
- line out (1/8” mono plug) – when connected, mutes speaker output
Free new VST synth from Lithium – Waveform..
…and more 
Check out Lithium’s homepage here >>
Lithium Sound has released Waveform, a freeware synthesizer instrument for Windows. Waveform is a simple wave table synth and was created for making more organic (organ, ep) tones.
| Waveform | |
 Waveform is a simple wave table synth and was created for making more organic (organ,ep) tones. Download |
|
| Silver Bass | |
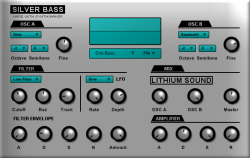 Silver Bass is a simple analog style synth for making Drum&Bass, Hardcore, and Dub basslines but is also useful for making classic rave stabs. Download |
|
| Rastabox | |
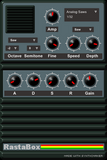 Emulates classic dub siren sounds and such. KVR Developer Challenge 2007 entery.Download |
|
| Blaster | |
 Ray gun noise maker.Download |
|
Two new synths from Yamaha
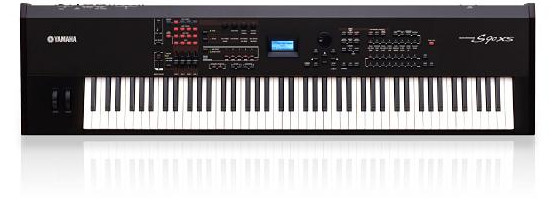
Yamaha has announced two new synths designed specifically for players : the S90 XS and S70 XS Music Synthesizer. Here is an excerpt from the official website :
“Designed specifically for players, particularly those who want the highest quality piano sounds and expression, the S90 XS/S70 XS is a performer’s dream. Yet, casual players and hobby musicians will appreciate the exquisite sounds, advanced features and superb playability just as much as top professional artists.
Main features :
Features:
– A new C6 Piano sound. Sounds promising
– All the sounds of Motif XS incl. arps
– All piano sounds of S90ES
– Ideal for Live performing. Easy to spit sounds on de keyboard.
– Mic/Line input. Input gain knob on the front.
– Record your perfomance (incl. Mic.) Everything you sing/speak and play can be recorded (max. 18 minutes in internal flash or otherwise USB
– 76 Keys (on special demand)
[youtube=http://www.youtube.com/watch?v=5xtk3F0IFWU]
Sorry no audio in this video
Good Reason tutorials to enjoy
I got a tip on these nice tutorials that are really good. They are mostly for
propellerheads reason, but can easily be applied to other synths.

The Bodyrox Yeah Yeah synth

[youtube=http://www.youtube.com/watch?v=YT3u6HNWsi0]

Dirty Electro Bassline In Reason Tutorial

[youtube=http://www.youtube.com/watch?v=i0LP5S3UwpU]

Wobble/Wow/Fidget Effect In Reason

[youtube=http://www.youtube.com/watch?v=eZZER6SukpY]
Cobalt 60, french EBM

EBM bands from France are rare indeed, but maybe you have heard of Dominique Lallement’s projects Kriegbereit and Cobalt 60. Cobalt 60 featured Front 242’s Jean Luc DeMeyer on vocals, released several records and appeared in the games “Command and Conquer: Red Alert” and “Wing Commander: Prophecy”.
On Friday, Lallement and his long-time friend Fred Sebastien delivers “Distort Neural Unit” under the name K-bereit. Members from Autodafeh, SA42, Punish Yourself and Dolls of Pain guest on this debut album, released via Sigsaly Transmission.
[youtube=http://www.youtube.com/watch?v=fhgbTNEPPF0]
Free Moog drum machine

The Minimoog Voyager RME is an analog waveform sculpting masterpiece, especially with the add-on CV breakouts. Unlike many classic analog drum machines, the Voyager with its dual filters can create wonderful stereo imagery. I’ve taken the time to program detailed percussive patches & from these i’m creating sample sets. This is the 1st “Moog Drum One” Drum Rack for Ableton Live 8.
Captured @ 24bit/96k with Lynx converters & DBX 903 compression.
Analog Signal path = Moog Voyager-DBX 903’s-Console EQ-Dominator II- Lynx.
Six velocity samples per pad.
Download : To install, extract the Pack with Live into a folder of your choosing. Then open the extracted project & save the Drum Rack into your library.
Getting to know the AKAI APC40
This video is a step-by-step tutorial describing Ableton Live 8’s new custom parameter mapping methodology. The video illustrates how to map select parameters from VST plug-ins into devices and then control these parameters via the Novation Remote SL and the new Akai APC40. The video also discusses how to add and access more than 8 parameters. Lastly, the video covers use of instrument racks and macro controls to map parameters from multiple devices to an 8 knob group.
[youtube=http://www.youtube.com/watch?v=QDpSQP-7JNQ&feature=player_embedded]
Enhance your drumkicks via sinewawes – tutorial
Excellent article by Björgvin Benediktsson
People spend ages pondering how to get that kick drum sound. They want the big fat boom that they can hear on records, but can’t recreate it themselves. And not for lack of trying. I have a trick that can help you make your kick drum all that much fatter, resulting in a sound you can use for tight, throbbing pile driving rock or for fat hip hop beats. I’ll be using Logic Pro 8 in this tutorial but any decent DAW will produce the same results.
Adding sine waves to kick drums
When you have your kick drum recorded and you’ve spent hours trying to squeeze out a fatness that isn’t there, maybe you can use artificial tricks to enhance the kick drum sound. Enhancing the low end by adding a sine wave generated by your DAW’s oscillator is a great way to add thump and boom to your bass drum track, whether it be rock, hip-hop or whatever genre you choose to make.
A sine wave is the most simple sound wave you can find, representing only the fundamental frequency you choose — in this example, 50 Hz. It doesn’t include any harmonics, unlike the square or sawtooth waves. So by adding a sine wave to the kick drum we will only be adding one tone, and not a musical element or characteristic.
Step 1 – Get your original kick in good shape
You have your kick drum track EQed, gated and compressed however you like it. Get your kick sound the best it can be before following the rest of this tutorial, because the sine wave is only going to enhance the bottom, and is not a character in itself.
I gated mine to get rid of the snare sound bleed and most of the hi-hats. I compressed it moderately (for rock) and EQed to enhance the click and cut out the boxiness. I also filtered it quite high because I thought it sounded better when I added the sine wave later on. Always think of the sound as a whole, not two sound sources that sound great individually but clash when they are together.

//
Step 2 – Make a new track for the sine wave
Add another track below the kick drum. Name it “Sinewave for kick.” We won’t actually be putting any audio into that track, but rather putting a test oscillator on the inserts.
In Logic, you can find the test Oscillator under Utilities > Test Oscillator > Mono.

Step 3 – Make the sine sound
Next step is to make a 50 Hz sine wave continuously oscillate on the track. On the Test Oscillator there are many functions, different types of sound waves and noise you can generate to calibrate your equipment for example. We will be choosing the sine wave…
Learn all about Circle
Circle is the powerful, easy to use software synthesizer from FAW. If you are not familiar with Circle yet, FAW have posted new tutorials on their website. Mo Volans, a regular contributor to EQ, Remix and Music Tech Magazine, presents a series of step by step tutorials for designing sounds with Circle. Tutorials 1 to 4 are available now, with more being added in the coming weeks.
Creating a Classic Brass Sound
For the first tutorial we walk through the creation of one of the easiest sounds to synthesizer, a classic analog brass sound. Read more…
Creating an Electro Synth Bass with Circle
Building recreations of classic synth patches is a great way to familiarise yourself with Circles interface We have already looked at a classic synth brass sound and a bass patch, so now lets build something with a slightly different character and a few more modulations. Read more…
Creating a Classic Synth Lead
As we have already discovered, creating your own patches with Circle is really straight forward.
Let’s take a look at another basic sound to help you get more familiar with Circle’s environment. Synth bass sounds are possibly the most popular patch on any synth. Read more…
Creating a Creating a Noise Based Sweep Effect
So far we have looked at how to go about creating some basic instrument patches using Circle, now lets focus on building some classic synth sound fx. Read more…
DATAMASKIN

