
Peff: Tesla Coil Samples
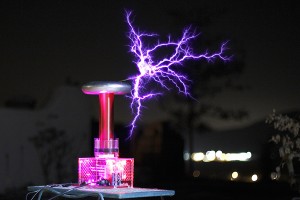
Peff has a new item out – a pulse wave oscillator called the oneTesla, here’s what he has to say about it:
For those who follow my social media streams, you may have already seen the various DIYAudio, DIYSynth, DIYrepair projects going on around here for the past year. One of these projects is the oneTesla Musical Tesla Coil kit. In “synth speak” it’s essentially a pulse wave oscillator. The oneTesla incorporates an arduino brain that receives MIDI note information, and the sparking plasma threads emitting from the coil oscillate at musical pitches. I certainly recommend the kit if you’re looking for a fun weekend project, however it may require some debugging and may also require the need for a function generator and oscilloscope. Over the past year it seems that the development team has ironed out the kinks in the design and even novices generally have great success in their builds.
The link below is an archive of the multisampled notes generated from the oneTesla. I’ve provided the archive as a folder containing an NN-XT patch. The audio was recorded at quite a distance from the Tesla coil, mainly because I didn’t want the coil to discharge through the microphone, but also because the output is incredibly loud. The recorded results aren’t as impressive as having the real-time audio-visual experience, so get a better “feel” of the actual sound, it’s recommended that you run the sampler output into a peak limiter and push the gain up 3dB to 9dB, and play the samples back at very high levels. The coil is sampled note-by-note from MIDI C0 to C5, and you will hear “spark” artifacts and a few obvious loop edits.
oneTesla-TeslaCoil_samples.zip
Groovesizer Alpha: infinite random, accents, pattern chaining
http://groovesizer.com
A demo of infinite random mode, accents, and pattern chaining on the Groovesizer Alpha.
The Groovesizer (pronounced groove-a-sizer) is a DIY 8-bit audio platform. It’s a musical chameleon that can take on a number of different roles from sequencer to synth, drum machine, or midi controller. Exactly what the Groovesizer is at a given moment depends on the firmware it’s running. Existing firmware can be freely hacked, or new firmware developed using the beginner friendly Arduino IDE. Firmware is loaded to the board directly from the Arduino IDE, either via an AVR ISP programmer, or by flashing the Atmega chip on an Arduino board and swapping it out.
The Groovesizer is based around a custom PCB that features 6 potentiometers and 5 rows of 8 tactile switches and leds (4 rows for the sequencer / trigger buttons and 1 row dedicated to control functions). It features an integrated Arduino clone, an 8-bit DAC option, an LM386 amp output, MIDI in/out/sync and is configurable to work with some of the most popular existing Arduino audio projects.
Furthest along in its development is the Alpha firmware which features a 3 oscillator monosynth attached to a 32-step sequencer with 112 memory locations to store patches and patterns.
Groovesizer Alpha & Doepfer Dark Energy: random patterns
The Groovesizer (http://groovesizer.com) with Alpha firmware is a DIY 32-step sequencer and synth. In this video, it’s controlling a Doepfer Dark Energy via MIDI. The video shows off the random pattern generation of the Groovesizer Alpha (major, minor, pentatonic, chromatic).
The Groovesizer (pronounced groove-a-sizer) is a DIY 8-bit audio platform. It’s a musical chameleon that can take on a number of different roles from sequencer to synth, drum machine, or midi controller. Exactly what the Groovesizer is at a given moment depends on the firmware it’s running. Existing firmware can be freely hacked, or new firmware developed using the beginner friendly Arduino IDE. Firmware is loaded to the board directly from the Arduino IDE, either via an AVR ISP programmer, or by flashing the Atmega chip on an Arduino board and swapping it out.
The Groovesizer is based around a custom PCB that features 6 potentiometers and 5 rows of 8 tactile switches and leds (4 rows for the sequencer / trigger buttons and 1 row dedicated to control functions). It features an integrated Arduino clone, an 8-bit DAC option, an LM386 amp output, MIDI in/out/sync and is configurable to work with some of the most popular existing Arduino audio projects.
Furthest along in its development is the Alpha firmware which features a 3 oscillator monosynth attached to a 32-step sequencer with 112 memory locations to store patches and patterns.
Introduction to the RN-9090
RN9090 is a 16 step TR style sequencer with 12 rows (looks like it can display 1 octave or 12 instruments) 12×16 matrix. made for the 909 clone DIY project (drums) hence the name.
A short demo of my Arduino based MIDI sequencer the RN-9090.
Arduino MIDI Sequencer – RN-9090
This is RNInstruments 12×16 step sequencer developed with the Arduino.
Groovesizer Alpha – first taster
The Groovesizer is an arduino-based DIY 32-step sequencer / synth – the project is based around a custom PCB that in it current form features 4 rows of 8 tactile switches and leds – the final version will add a fifth row of buttons and leds dedicated to control functions. It features an embedded hackduino, an 8-bit DAC option, an LM386 amp output, MIDI in/out/sync and is configurable to work with some of the most popular existing arduino audio projects. Firmware can be updated from the arduino IDE, either via an AVR ISP programmer, or by flashing the chip on an arduino board and swapping it out. Furthest along in its development is the Alpha firmware which features a 3 oscillator monosynth. Other firmware will include the Bravo which borrows code from the Bleeplabs Bleepdrum https://www.sparkfun.com/products/11606 , the Charlie, based around the Illutron 4-voice wavetable synth http://www.instructables.com/id/Turn-… , and the Delta, based on the original Groovesizer with the auduino synth engine http://www.youtube.com/watch?v=9zsxWf…
The complete kit with PCB and all components will be sold for around US$100 – follow the progress on this project at http://groovesizer.com
Ribbon Controller Test Coagula build
A test of the MIDI Ribbon Controller designed by Giuseppe Di Cillo.
“This is a prototype until I have all the rest of the project finished. The MIDI is implemented via an Arduino Uno R3 board and the sketch by Giuseppe. It is his first sketch prior to the more complex build with an LCD and menu dialog. Very simple and perfect for combining the MIDI output with a modular. I have since added a CV and GATE output to the modular panel which allows the ribbon controller to output analog and digital (MIDI) at the same time. This video doesn’t show the later use of the modular analog signals.”
The ribbon strips were made by Spectra Symbol and Interlink and were bought from Sparkfun dot com.
A detailed build guide and software for the Arduino can be found at Giuseppe’s wonderful blog. coagula dot org.
Meganome — DIY Arduino MIDI Controller
The Meganome is inspired by the monome controller and powered by an Arduino Mega. Like other grid controllers like the Launchpad and Push, it has performance modes for triggering drums, playings synths, and launching clips and effects. I like the feel of arcade buttons and look of exotic hardwoods, so mass-market products just weren’t right for me.
You can see how the grid-based layout makes octave jumps and glisses really easy in this video: http://youtu.be/Gsph_10sb64?t=2m18s
Watch the Meganome be used as a drum machine: http://youtu.be/rMrk-pZ4RBk
Patrick writes with more details:
I just uploaded a demo video for my custom grid-based controller, the Meganome. The design is obviously inspired by the monome, but it departs in a couple ways from the monome and its cousins. I wanted larger buttons with light but solid action for triggering drum hits and synth notes–buttons that are hard to miss and give you a nice “clack” sound when struck. The rectangular arrangement with 14 buttons per row lets me display the entire
chromatic scale plus two notes of overlap when the Meganome is in synth control mode. Like the Push controller in its chromatic mode, the notes of the scale I’m in light up, but unlike the Push, the Meganome lays octaves along its columns, which makes for easy traversal of octave space and wide chord voicings. Triads, on the other hand, are tricky.
I did a blog post on difficulties I encountered while building it and posted my Arduino code on my blog:
http://jazarimusic.com/finally-a-diy-midi-controller-with-purpleheart/
Toa Mata Band Episode1
This video is about an electronic band of toys-robot that play some tiny music instruments drived by Arduino Uno and Clavia Nordbeat, a MIDI sequencer app for iPad.
http://www.opificiosonico.com
http://www.facebook.com/OpificioSonico
https://twitter.com/OpificioSonico
http://www.flickr.com/photos/opificio…
Unleash the Beast – Bit Beast Synth Demo
A demo song of the Bit Beast synthesizer. All sounds (including drums) are made with the Bit Beast and recorded into Ableton Live. Some minor FX were added to some tracks (reverb, delay, EQ).
The Bit Beast utilizes a method of tone generation commonly called ‘bit banging’. It turns a digital bit on and off at the frequency of specific notes. This method of creating sounds is typical of old videogame and computer systems. The processor that reads the MIDI signal and ‘bit bangs’ the notes is the same one used by the Arduino UNO (ATMEGA328P-PU). All the code is written and compiled in the Arduino software. This means that anyone with an Arduino UNO can edit and tweak the code. This will allow musicians to customize their synth to some degree, and expand upon the base functionality.
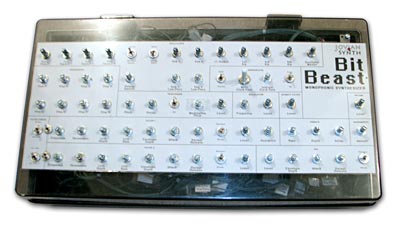
The notes are then chopped up and processed using CMOS logic chips. The effects created are common in the DIY realm, but seldom available in commercially available synthesizers.
The sound then passes through two analog voltage controlled filters. Both filters are unique designs that offer very different sounds. Filter 1 is a 12db state variable filter with low-pass and band-pass modes and overdrive control. Filter 2 is a 6db filter with low-pass and high-pass modes and a squelchy distorted resonance. The filters can be configured in parallel or two different serial configurations. Both filters have their own LFO and envelope generator.
The final step that the sound passes through is an analog VCA with a dedicated envelope generator.
More info on the Bit Beast here: http://www.joviansynth.com/bit-beast.php
The Bit Beast is not currently in production. The estimated cost is about $500-$600. Please send us an email if you would like to be notified when more information and availability is known – info@joviansynth.com
DATAMASKIN

