
Reason as a powerful mastering tool
Thanks to its external audio sampling and sample-playback capabilities, Propellerhead Reason 5 makes a handy mastering solution for your music irrespective of that music’s origin platform. SO long as you can bounce your music to a WAV file, you can play it back in Reason 5 and feed it through the impressive-sounding MClass rack effects.
While that may sound fairly straightforward, there are some nuances to this method. For instance: what device in Reason 5 should you use to playback your unmastered audio? That and more are covered in this methodical how-to video.
Shared by Gearwire
Understanding the basics of warping full tracks
Ableton Certified Trainer and Dubspot Instructor, Michael Hatsis, a.k.a. !banginclude explains and demonstrates basic and essential warping techniques in Ableton Live in the part one of this three-part video tutorial series exploring creative ways to warp tracks in Live. Using a standard house track with a 4×4 drum pattern, Hatsis shows how to set Live warping preferences, determining and entering an approximate tempo by tapping the tempo Tab along with the song, figuring out the downbeat and set where the track starts, in this case – first kick, transient marker. Stay tuned for part two and three, as Michael Hatsis delves further into Live and offers more creative tips and techniques for warping.
For more info – http://bit.ly/gmwhsZ
The secrets of trance music – How to make a killer lead and bass
How To Make Lead and Bass Like Dash Berlin Disarm Yourself feat. Emma Hewitt (Club Mix)
In this video:
I received a request for this tutorial and this is the result. This video is my take on reproducing the lead and bass sequence from the track “Disarm Youself feat. Emma Hewitt (Club Mix)” by Dash Berlin. It uses Sylenth1, compression, eq, and saturator in Abelton Live. In the actual track, there’s also a piano part present that I did not replicate in this tutorial.
How to create Mix Groups in Propellerhead Record
Here’s a new video showing how to create a mix group. Promoted as the DAW for musicians, Propellerhead Record nevertheless features some of the most sophisticated (and intimidating) mix routing of any multi-track recording software. While this opens the opportunity to do some very creative things in the mix interface, it also makes certain basic functions — like creating mixing sub groups — a little confusing.
That’s why we’ve put together this step-by-step video on how to create submixes in Record. It may require a few more steps than creating subgroups in other DAWs, but the visual routing component presented by the virtual rack view (ported from Reason) aides the process. As does Owen’s patient, guiding voice.
Via GW
Sample Everything and Anything in Propellerhead Reason
Learn how you can use Reason to sample everyday noises, objects and machines around the house, circuit bent toys, and synths to create your own unique sonic fingerprint.
Apple Core MIDI Sync for Looptastic, grüvtron and Ableton Live
Here is a video to show how you set-up Looptastic, grüvtron and Live using Core MIDI and WiFi. This requires iOS 4.2 or above and the latest versions of Sound Trends’ Looptastic HD (iPad), Looptastic Producer (iPhone/iPod touch) and/or grüvtron (iPad or iPhone/iPod touch). To sync with the Mac please use Mac OS 10.6 and a Core MIDI compatible app like Ableton Live, Logic, Reason, etc.
Ableton Tutorial – Ping Pong Delay
http://www.pointblankonline.net/mixing-dance-music-course—ableton.php In this video, Danny J Lewis (Defected, Enzyme Black) demonstrates how a ping pong delay can be used to build tension in a build up before the groove kicks back in.
This is the first of the series of tutorials taken from the Mixing Dance Music in Ableton course (http://www.pointblankonline.net/mixing-dance-music-course—ableton.php)
Understanding Logic Pro Automapping with Novation controllers
In this video tutorial, Novation product specialist Brandon Carroll stops by Dubspot to explain and demonstrate creative production possibilities with Novation 25 SL MkII MIDI Keyboard Controller and Logic Pro. Brandon starts by showing you how to setup the 25 SL, which comes with Automap Pro, and gives you complete control over your production software. He further shows you how to enable touch-sensitive knobs and faders and utilize the X and Y modulation and drum pads, sort through patches, access plug-in instruments and effects and create a track with chord progression and groove.
Filter modulation on the U-HE ACE
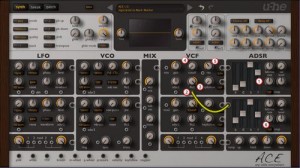
My friend Mark Mosher has posted a nice article on how to modulate a filter with an envelope:
U-HE ACE is my favorate analog modeled virtual synth and once you “grok”” the cabling you can do amazing things with it. If you find the cabling confusing, checkout my video from last year “U-HE ACE Tutorial: Patch Cables 101” which I’m happy to report is closing in on 12,000 views.
Via a YouTube I got a question from a reader on how to modulate the filter with an envelope so I thought I’d put together a quick step-by-step tutorial. Click the image above to see a larger version to follow along.
- Bump the “r” or release time on the amp envelope to give us more sustain time so we can make room for the filter envelope to work
- Patch a cable from the output socket of ADSR2 to the socket under LFO2. Now the knob for LFO2 turns into a bi-polar gain knob.
- Turn the the gain knob all the way up for maximum modulation from the ADSR
- Turn cutoff to 0 so the filter is 100% controlled by ADSR2
- Turn the “res” up just to make the effect more pronounced
- Adjust the ADSR value to match the screen shot
Tweak to your heart’s desire.
Sampling Inside the Reason Rack
Sampling isn’t always about sticking a mic in front of your dog to turn his bark into your next bass lead. Sometimes the best stuff you can sample is inside the Reason rack. Why would you want to do this if it’s already in Reason? There’s plenty of reasons and Mattias Häggström Gerdt will show you the why’s and how’s.
DATAMASKIN

