
Tutorial: How to Make Nasty Filtered Bass in Massive & Ableton
Ever wanted to find out how to create that effective glitch bass sound in Massive, then check this tutorial out:
BASS SOUND DESIGN COURSE: http://vespers.ca/shop/lessons-and-workshops/audio-weapons-ableton-live-inter… How to make a glitch hop style bass patch in Native Instruments Massive synth using a saw wave oscillator, unisono detuning and pan spreading, bandpass and daft filters, macros, pitchbends, and filter frequency automation. Using Ableton Live as a host. Tutorial by Vespers, Certified Ableton Trainer.
How to Make Music With iPad Apps – iMaschine / Korg MS-20 / Animoog / GarageBand / BeatShuffler
In this Ableton tutorial Danny J Lewis experiments with creating a drum and bass track idea entirely with iOS Apps recorded into Ableton Live. It is part of our series of Making Music With Apps tuorials.
Go to: http://www.pointblankonline.net/courses/ableton-live-courses.php to find out how you can learn more about using Ableton Live as a recording tool. Please get in touch with our course advisors at advice@pointblankonline.net if you want to find out more.
Native Instruments Maschine Tutorial
Native Instruments Maschine has caused quite a bit of a storm since its release – to find out why, our good fiend Owen form 2twenty2 takes you through the features and applications in this three part tutorial.
The Maschine is an incredibly powerful sampler, sequencer and controller and in this first video we take a look at how to getting sounds onto the pads and what to do with them.
For full product specifications please visit:
http://www.dv247.com/drums-and-percussion/native-instruments-maschine–61792
Daft Punk Vocoder (Ableton Live Tutorial)
And here are the details:
Hello. My name is Mars. Today we’ll talk about vocal processing through a vocoder. Daft Punk have used this technique in many of their tracks.
I have searched for a long time to find a convenient and easy vocoder, and tried many different devices. When we started work on the PLAYMA track “Cuz We Are PLAYMA”, the vocals weren’t catchy enough, and at the time I had not had the opportunity to ask some of my friends to record vocals for me. I decided to try recording them myself, even though I don’t like my voice.
For the record, I used a standard iPod headset. That sounded funny and my voice was so wrong. Here I was not even in tune, but it’s ok for this example.
To begin, compress the vocal track a little bit to cut some peaks in the sample, then use the vocoder effect. In order to implement this effect, I first need to make a synth, which fills out my voice. For this I used a standard preset of “NI Massive” synth.
To create a melody for the synth, I copied the midi clip, which I used to lay down the guitar track. The Vocoder effect is very simple to use. To make it work you just need to select the source channel as the Massive synth. After this you should tweak up the effect a little for a more pleasant sound.
Next, add a slight delay between the left and right channels to spread the stereo, and cut low frequency a little bit.
Thank you for watching. My name is Alexander Mars and this was my tutorial on “Daft Punk vocoder”. If you are interested in professional, affordable music courses, head over to xssracademy.com. There you will also find more free video lessons and articles, so be sure to check it out. Click “Like” below if you enjoyed this video, see you soon!
MINITAUR + ABLETON LIVE PART 2: Minitaur as External Filter
In part two of this three part series, Moog Product Development Specialist, Amos Gaynes shows you how to integrate the Minitaur Analog Bass Synthesizer into Ableton Live. Learn how to use your Minitaur as an external filter, manipulate sounds in real time, and create a sequenced gate effect.
Learn more about the Minitaur at:
www.moogmusic.com/products/taurus/minitaur
Register your Minitaur at:
www.moogmusic.com/register
The Power in Logic Pro: Trailer with author, Dot Bustelo
Hal Leonard Books has published The Power in Logic Pro by Dot Bustelo. They claim that this book is the first choice for any artist seeking quick, fun, easy-to-digest insight into the depth of Logic. Author of “The Power in Logic Pro,” Dot Bustelo, introduces her new book, goes over the basic concepts covered, and gives a quick example from the book!
PURCHASE BOOK:
http://halleonardbooks.com/product/viewproduct.do?itemid=333399&lid=1&…
Dot Bustelo’s signature approach to teaching Logic will get you up and running quickly. She’ll help you move beyond the basics to discover a professional-level Logic workflow, taught through highly musical examples that expose Logic’s essential features and powerful production tools. You’ll find many of the tips, tricks, and insider techniques that powered Logic to its industry-leading status as the best tool for unleashing creativity in songwriting, composing, making beats, and remixing. Plus, find out why musicians over the years have sworn Logic “grooves better.”
Dot provides the powerful methodology for creating in Logic that she has shared with countless high-profile bands and Grammy Award–winning producers and engineers. Here’s just a sampling of what some of music’s most successful artists say about Dot’s approach to Logic:
Ronnie Vannucci, The Killers: “Dot has made Logic, well, logical.”
Ryan Tedder, OneRepublic: “Dot Bustelo has hands down the most extensive working knowledge of Logic and all its intricacies.”
James Valentine, Maroon 5: “Dot was the first one to introduce me to Logic. . . . She knows this software inside and out, and she breaks everything down in an easy-to-understand way. And she knows the best insider techniques that will make your recording more efficient and creative. . . . I wonder when Dot will get sick of me asking her Logic-related questions?”
Nathaniel Motte, 3OH!3: “Dot has provided me with an incredible source of in-depth and practical knowledge of Apple’s Logic program. She has shown me tricks in Logic that have opened creative doors that I didn’t even know existed.”
Chad Hugo, N.E.R.D., The Neptunes: “When you got a Logic problem / Dot has wrote a book to solve ’em . . . / And this right hear is it. Yeya!”
$16.99 (US)
Inventory #HL 00333399
ISBN: 9781458414199
UPC: 884088602147
Width: 8.5″
Length: 11.0″
200 pages
How to make a classic trance gate in Cubase
Background information:
Some plug-ins include stutter effects inspired by the sidechain gates used in classic ’90s trance tracks – just think of The Age of Love’s eponymous hit.
You can gain more control over the sound if you do it the old-fashioned way, though; in the video above, you’ll see how it’s done in Cubase.
You can download the audio files that the video refers to by clicking here.
Inside Synthesis – Introduction to Modular Synthesizers
Episode 3 from the original series – a very basic introduction to modular synthesizers.
Correction #1 – I refer to modulating the amplitude of an audio signal with another audio rate signal as Ring Modulation (RM). I should have said Amplitude Modulation (AM).
RM is certainly related to AM, but there’s a distinct difference. RM is implemented in such a way that the carrier and modulator’s frequencies are eliminated from the signal. You only hear the sums and difference frequencies of the carrier and modulator, but not the original carrier and modulator frequencies.
Interestingly enough, the AC-coupled circuitry that does RM is ring shaped.
Correction #2 – Neither RM nor AM add harmonic frequencies. They add sidebands of inharmonic frequencies – hence the metallic and dissonant sound.
Cakewalk: BlogBytes; Using the Beatscape Factory Content in SONAR X1
Cakewalk’s award winning software SONAR X1 comes with Beatscape Factory Content. This content is sometimes overlooked by users since Beatscape came with SONAR 8 as an individual sample player. Now with the ProChannel, Browser and Drag and Drop, this content is great for building creative grooves.
Korg Radias – Step Sequencer Tutorial
“This is for the people that had asked me to do a tutorial on the Korg Radias Step Sequencer. This is the Low quality Version, I will upload the 720 Version soon. Please note – This is a Very Basic – I say again. Very Basic Tutorial on Step Sequencing and Creating a sound that has Velocity Sensitivity effected by the Step Sequencer causing the Filter (EG1) on the Radias to change the way the notes are played.”
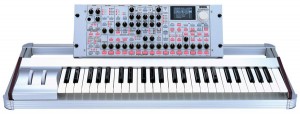
The Korg Radias is a Virtual Analog synthesizer that was released by Korg in 2006. It takes advantage of the MMT (Multiple Modeling Technology) that their flagship OASYS synthesizer module employs. The synthesizer itself is similar in design to the MS2000, but offers many more capabilities. It is capable of emulating older digital synthesizers and classic analog synthesizers like the MS-series without any noise or aliasing. The Radias also allows for various external sounds to be fed through its filters and envelopes. It also has the Korg DWGS (Digital Waveform Generator System) that the Korg DW-8000 employs.
The Radias also takes advantage of the KKS (Korg Komponent System) which allows it to be used with the 49-key keyboard or used as a standalone rack module, and the Radias-R unit can be connected to the M3 Music Workstation/Sampler along with its various keyboard models.
The Radias has two oscillators per timbre and a noise generator. Oscillator #1 has nine basic waveforms, with four types of modulation and PCM (64 synth sounds, 128 drum sounds) and Oscillator #2 has four basic waveforms with two types of modulation. The Radias has the ability to stack up to five types of waveforms in Oscillator #1, while using only one voice of polyphony. In Unison mode, you can stack five additional waveforms, while using more polyphony. With this function, you can create some awesome super waveforms-the overall result can contain up to 25 detuned waveforms. The Radias also has two Low-frequency Oscillators (LFO) that add more modulation to the two audio oscillators. These LFO’s provide six waveforms and their speeds can be set manually or by tempo.
The Radias itself has four timbres per program. With a timbre, you can assign one drum program, another can have a lead, a bass, and a vocoder as well; all in one program! Each timbre can contain one synthesizer/drum kit, equalizer, and two multi-effects.
The Radias has two filters that can be used side-by-side, individually, or in a series. They offer Low Pass, High Pass, Band Pass, and Combination modes. Each filter offers 24 or 12 dB modes for the low pass filter. The effects on this unit are remarkable as well. The Radias comes loaded with 33 different effects: Delays, Chorus, Flangers, Compressors, talking modulator, and even the good old Polysix Ensemble effect. You can assign one master effect to the program, while each timbre gets its own two effects, creating a whole world of possibilities. The Radias also offers a 16-band vocoder with a nice Formant Motion recording function that allows you to record up to 7.5 seconds of external audio which can then be triggered via the keyboard.
The Radias has a built in arpeggiator as well, providing six different patterns to choose from. Patterns can be up to 32 steps long and the gate/velocity can be set for each step to get that sound you want! It also has two 32-step sequencers (they can be combined for a 64-step on a single timbre). They can easily be assigned to a drum kit, for example, to use the Radias as a programmable drum machine. The step sequencer supports 8-voice polyphony per step.
DATAMASKIN

